


2021.01.12
2023.11.14
How to Create e-Learning Materials ③ - Video Format Edition -

-
Category
Recommended Articles
-
What is Vyond? Introducing the benefits of an animation video production tool that can be used for business.
-
[Animation Teaching Material Production] How to Create e-Learning Materials ②
-
How does Vyond differ from other animation production software? Comparison and recommendations
-
Can Vyond animations be used as teaching materials? Here are the benefits of using them in e-learning and training.
-
Let's create business animations with Vyond! An explanation of the reasons and benefits recommended for business, as well as challenges.
-
Vyond Go (AI Video Generation) Tips and Best Practices ① Vyond Go Setup Guidelines
-
Moodle Basic Course: What is Moodle?
-
[Moodle Basic Course] What can the e-learning management system Moodle do?
-
[Moodle Basic Course] What can be done with Moodle's default features
-
Benefits and Considerations of Moodle Cloud Services
-
Moodle is not only used by universities (widespread use)


Continuing from the last time,
・I want to challenge myself with education through e-learning, but I don't know where to start.
・I want to create the teaching materials in-house as much as possible.
We will explain about educational material production for those in charge of education who are considering this.
In the first session, we explained "Three Formats of e-Learning."
1.Animation (HTML5 format)
2.Video format
3.PowerPoint, PDF
This time, we will explain the overview and production methods of educational materials in the "video and video format".

1. Types of Audio-Visual and Video Materials
Videos used in e-learning are classified into four types.
1. Workshop videos
2. Interpersonal skills training videos
3. Technical training videos
4. Others
1. Training Seminar Video
This is a teaching material created by capturing images of the instructor conducting training and using materials for lectures.
The mainstream format displays the instructor along with materials that correspond to the explanation content on the same screen.
In the classroom, the instructor conducts lectures using a whiteboard, but in e-learning, students progress their learning by watching the instructor and materials on the screen instead.
2. Interpersonal Skills Learning Video</h>
This is a video teaching material suitable for learning sales know-how and human skills.
Actors and related personnel appear and proceed based on the script. By seeing the actual communication, it visually conveys points that are difficult to express in writing.
3. Technical Training Videos</h>
This is a suitable teaching material for understanding and learning how to use equipment and technology.
By using live-action, the actual movements of the equipment and the actions of the operator are conveyed without misunderstanding.
4. Others
Other formats are those that do not belong to the three types mentioned above. These include interview videos and videos introducing facilities and equipment.
2. Production Process of Video and Video Format e-Learning Materials
The process for completing e-learning materials in video format is as follows.
Step 1. Creation of Storyboard
The storyboard for filming is a visual representation of the completed teaching materials.
It consists of screen images and narration, among other elements.
During filming, it is necessary to include essential information so that staff such as cameramen and performers, as well as editing staff during post-production, can share the completed vision.
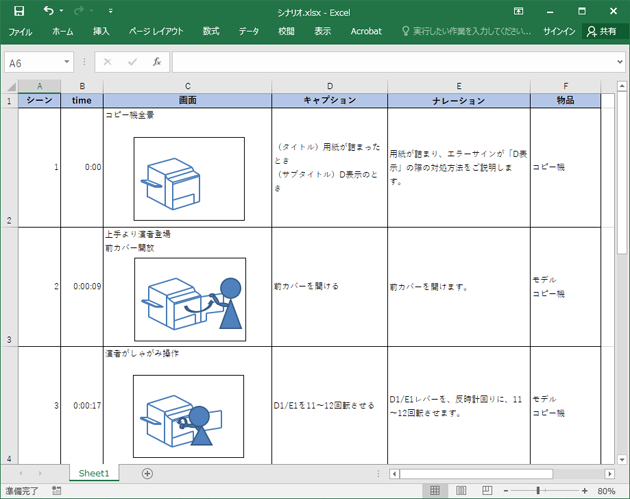
Storyboard Image
Step 2. Consideration of Performers and Shooting Locations
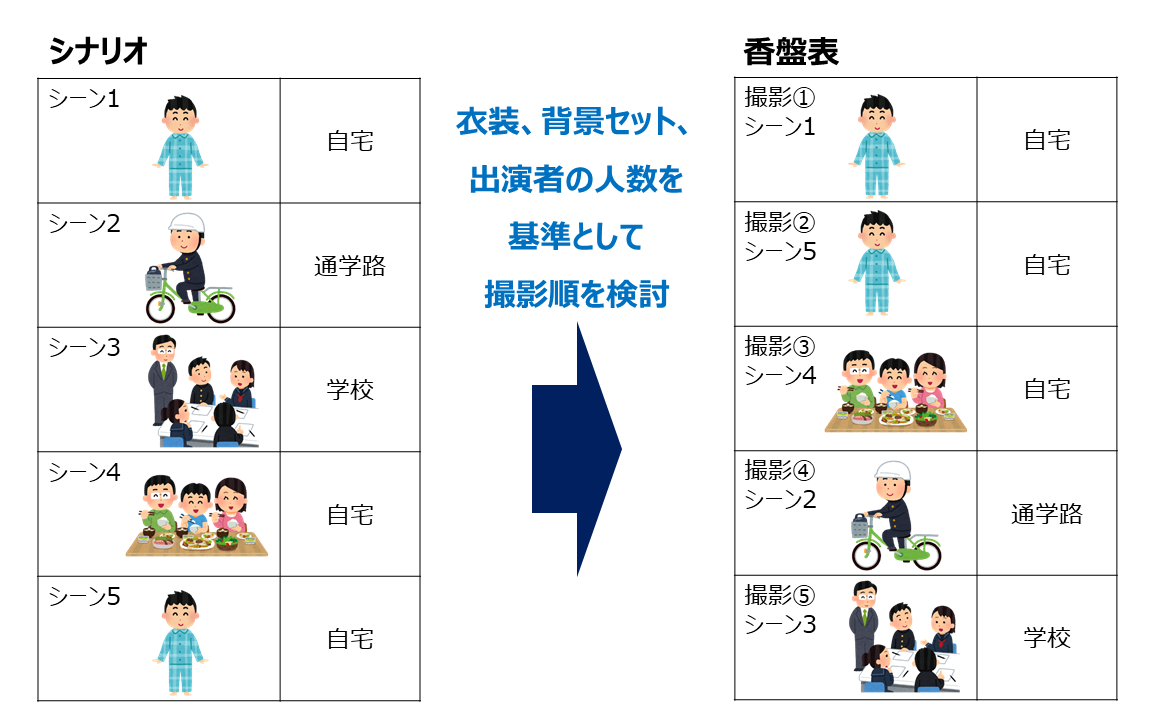
We will consider the cast and filming locations. Additionally, we will create a "shooting schedule" (koban-hyo) that summarizes the filming arrangements.
When arranging for professional actors as the cast, we will communicate conditions such as age and gender to the production and coordinate schedules. Selection may involve nominating from multiple candidates or conducting auditions.
If the shooting location is outside the company, prior permission may be required, so caution is necessary.
Also, if possible, conduct a location scout to check the setup of equipment and camera angles on the day of the shoot. By doing a location scout, you can consider the shooting positions for each scene in advance, allowing for a more efficient process on the day of the shoot.
The "shooting schedule" is a document that summarizes the arrangements for filming.
For example, depending on the cast, there may be cases where their scenes are limited to just the beginning and end of the video. In such cases, proceeding with filming according to the story of the video would be inefficient.
The shooting schedule is designed to consider the order of filming to ensure efficiency.
In addition to the cast, it also takes into account costumes, props, and background settings.
Step 3. Arranging the Shoot
In the final stage of preparation, we will make the necessary arrangements for the shoot.
We will arrange equipment and staff.
We will secure cameras, lighting, props, audio recording equipment, and the staff responsible for each.
If external resources are used, arrangements will be made through specialized vendors or rental companies.
Depending on your budget and required quality, there may be cases where we shoot with a home video camera or smartphone.
If the shooting is done only by in-house staff, let's prepare the necessary personnel and equipment based on the shooting schedule.
Please note that when producing 4K, 8K, or VR content, compatible equipment is required.
If you need actors or narrators, we will make formal arrangements at this time.
If you are photographing outdoors or in buildings, be sure to apply for a shooting permit as well.
It may take time to obtain the shooting permit, so it is recommended to apply early.
Additionally, when bringing equipment such as cameras to the shooting location, a separate application may be required apart from the shooting permit. Please be sure to check.
Step 4. Photography
On the day of the shoot, a meeting and rehearsal will be held with all participants, including the cast, before proceeding with the filming.
The most important thing during the shoot is to ensure that nothing is missed. Additionally, there are limitations to what can be corrected in editing later, so it is essential to make a clear judgment on whether a take is OK or NG, and to proceed with the filming confidently.
If anything is missed, a reshoot will be necessary.
Step 5. Editing
There are two types of editing work: "rough editing" and "final editing".
In the "rough edit," we finalize the overall structure and flow.
We cut the NG takes and rearrange each scene in order according to the script.
We check for any unused NG takes, missing scenes, or other editing mistakes.
If there are no issues here, we proceed to the final edit.
In this editing, we will perform adjustments to sound quality and volume, add effects for scene transitions, and make color corrections.
Step 6. Narration Recording
There are two methods for adding narration to a video.
・Record the narration first and synchronize it during video editing.
・Perform video editing first and record the narration to match the video.
If you record the narration first, you will need to adjust the video to match the length of the completed narration audio.
If you are editing the video first, you will record the narration while playing the edited video. This type of recording is called dubbing (after recording).
This method is recommended if you are hiring a professional narrator.
The narration text should be finalized during the storyboard creation process, but changes and revisions almost always occur during the preceding steps.
Therefore, it is best to conduct the narration recording as close to completion as possible; however, the presence or absence of narration can drastically change the impression of the video.
Therefore, we recommend using a temporary narration. The temporary narration can be recorded using a computer or a voice recorder. Until the final narration is recorded, you can check the video with the temporary narration to prevent discrepancies in the finished image.
It is acceptable for the temporary narration to have background noise, but the reading speed and pauses should be mindful of the final version.
Step 7. Encoding
Once editing is complete, encoding will be performed to finalize the video.
In video editing, encoding refers to the processes of "compression" and "conversion," which involve exporting in formats such as mp4 or wmv.
Once the encoding is complete, we will play it back to check for any significant omissions or issues.
If there are no problems, this is complete.
Once the completed materials are distributed to the learners, they can begin their studies.
If you are integrating with an LMS, format and register the materials. If you are not using an LMS, prepare and notify according to the distribution method.
Author:
Shizuko Sase
Education Solutions Department Production Group Writer
After joining Human Science, worked as a technical writer,
gaining experience in the design and writing of product manuals and business manuals.
Subsequently engaged in writing and production direction of e-learning materials.
Involved in the production of approximately 200 educational materials so far.
Contact Information:
Phone Number: 03-5321-3111
hsweb_inquiry@science.co.jp
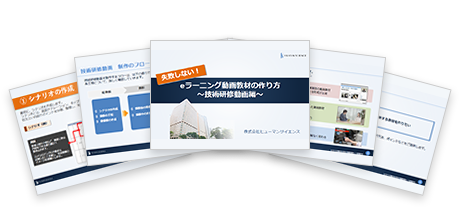
No Failures! How to Create e-Learning Video Materials
~Technical Training Video Edition~
This section explains the features and creation methods of technical training videos in e-learning video materials, as well as key points. It also includes common points related to video production.
[Content]
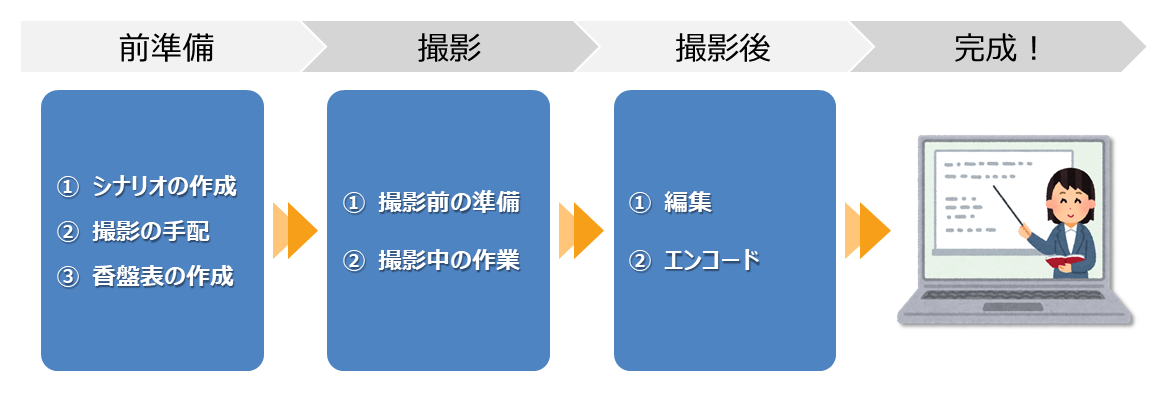
Technical Training Video Production Flow
1. Preparation (① Script Creation, ② Arranging Filming, ③ Creating Shooting Schedule)
2. Filming Day (① Pre-filming Preparation, ② Tasks During Filming)
3. Editing Work (① Editing, ② Encoding)
Related Information
Latest Blogs
- 2026.06.17
- How to Use PowerPoint × Vyond Effectively